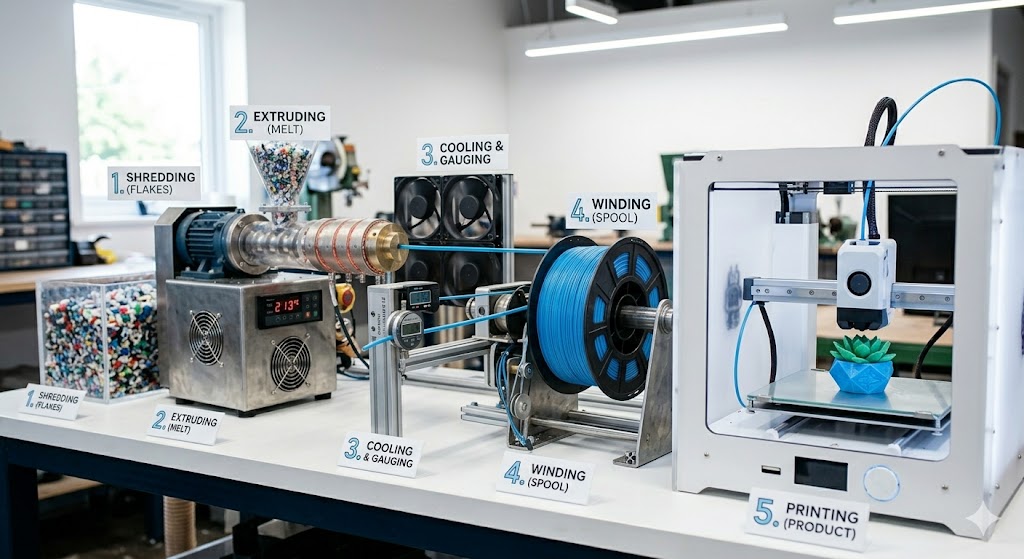

1. Shredding (The Breakdown)
Before you can melt plastic down, you need to get it into a uniform, manageable size. You can't just stick a whole soda bottle into an extruder.
Using a heavy-duty plastic shredder or a specialized desktop granulator, the plastic waste is chopped up into tiny, irregular pieces called pellets or regrind.
Pro-Tip: Sorting is crucial here. You cannot mix plastic types (like PET bottles with PLA scraps). They melt at different temperatures, and mixing them will ruin your final filament.
2. Drying (Banishing the Moisture)
Plastic is surprisingly thirsty. Many polymers are hygroscopic, meaning they absorb moisture from the surrounding air. If you try to melt wet plastic, the water turns to steam, creating tiny air bubbles inside the filament. This leads to brittle filament and terrible print quality. Before moving forward, the shredded plastic must be placed into a dedicated dryer or dehumidifier for several hours to ensure it is 100% bone-dry.

3. Extruding (The Meltdown)
This is where the real transformation happens. The dry plastic flakes are fed into a filament extruder.
Inside the extruder, a rotating screw pushes the plastic flakes through a heated barrel. The plastic melts into a smooth, consistent liquid resin and is forced out of a tiny nozzle at the end. The nozzle diameter is typically slightly larger than the target filament size (e.g., a 2.0mm nozzle to achieve a 1.75mm finished filament) to account for stretching.
4. Cooling (Setting the Shape)
As the molten plastic emerges from the extruder nozzle, it is incredibly hot and malleable. To lock it into a perfect cylindrical shape, it needs to be cooled down immediately and uniformly. Most setups pull the hot plastic strand through a water bath or pass it in front of a series of high-speed cooling fans. If it cools too slowly, gravity will cause it to sag and lose its roundness; if it cools too quickly, it can become brittle.

5. Winding (The Perfect Spool)
Once the filament is cooled and solid, it passes through a digital sensor that measures its diameter in real-time (aiming for that golden $1.75\text{mm}$ or $2.85\text{mm}$ standard).
From there, it is fed onto an automated spool winder. The winder must perfectly sync its pulling speed with the extruder's output speed. If it pulls too fast, the filament gets too thin; too slow, and it bunches up. A neat, tightly wound spool prevents tangles during your next print.
6. Printing (The Rebirth)
Congratulations! Your trash is officially treasure. Now comes the best part: loading your homemade spool into your 3D printer. Because recycled filament can sometimes have slight variations in diameter or purity, you might need to tweak your slicer settings slightly. Dropping the print speed a bit and bumping up the flow rate (extrusion multiplier) can help yield spectacular results.